Or you can just use a regular Cooler (≈ $20)
Large Stainless Steel Spoon or Wooden Paddle (≈ $5 for SS Spoon)
Pitcher (≈ $5) - The bigger the better and preferrably graduated
Kitchen Thermometer (≈ $3)
Large Pot for Heating Water (≈ $30) or a Turkey Fryer with Stand (≈ $60)
Bottling bucket (≈ $15)
Bucket with false bottom (≈ $20)
Sparge Arm (≈ $20)
Mashing/Sparging
For The Mash
First you will need to calculate how much water you will need for you mash. The typical ratio will be about 1.5 quarts of water per pound of grain. So if you had 14 pounds of grain you would heat your water to your mash temperature and proceed with your mash.
For Sparging
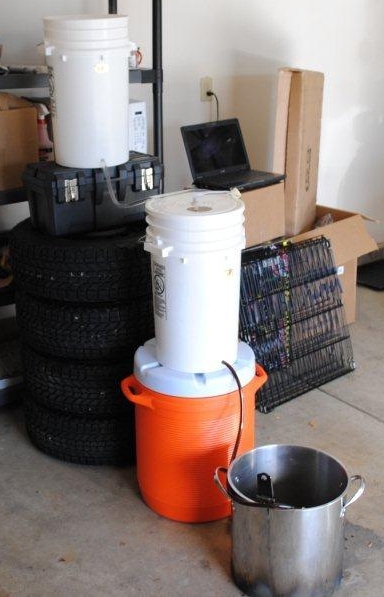
The first step is to heat water for striking. You will typically want to strike at around 170°F so you will heat the water to about 180°F or 185°F. Then you will pour your water into the top bucket shown in the setup up top or
here. Then you will pour your grain into the middle bucket which needs to have a false bottom. Then at the bottom of the setup will be your brew pot.
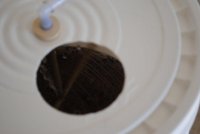
To get the setup in gear you will adjust the release of the top bucket to allow the water to flow slowly out into the sparge arm, which should be placed in the second bucket. The water flow will cause the sparge arm to spin as shown in the picture to the left. This process will "wash" the grain and extract the sugar to form the wort. The wort should then drain out of your middle bucket into your brew pot. When this process is first started, be sure to Vorlauf. To Vorlauf, just take a pitcher and collect the wort that is coming out. Then pour this wort back in with the grain. Repeat this process until the wort coming into the brew pot doesn't look cloudy. Then continue draining until you have the amount of pre-boil wort you need. This volume will typically be about a gallon more than what you expect your post-boil volume to be.
The Boil
Now you simply continue onto the boil process as usual. If you aren't familiar with the boil, the process is shown over in
this tutorial.
 What You'll Need
 To get the setup in gear you will adjust the release of the top bucket to allow the water to flow slowly out into the sparge arm, which should be placed in the second bucket. The water flow will cause the sparge arm to spin as shown in the picture to the left. This process will "wash" the grain and extract the sugar to form the wort. The wort should then drain out of your middle bucket into your brew pot. When this process is first started, be sure to Vorlauf. To Vorlauf, just take a pitcher and collect the wort that is coming out. Then pour this wort back in with the grain. Repeat this process until the wort coming into the brew pot doesn't look cloudy. Then continue draining until you have the amount of pre-boil wort you need. This volume will typically be about a gallon more than what you expect your post-boil volume to be.